Ansible概要
Ansible是什么?
Ansible是一个自动化管理远程系统的工具,它主要有两个功能:
- 自动化管理远程节点
- 控制远程节点,让它们满足预期的状态
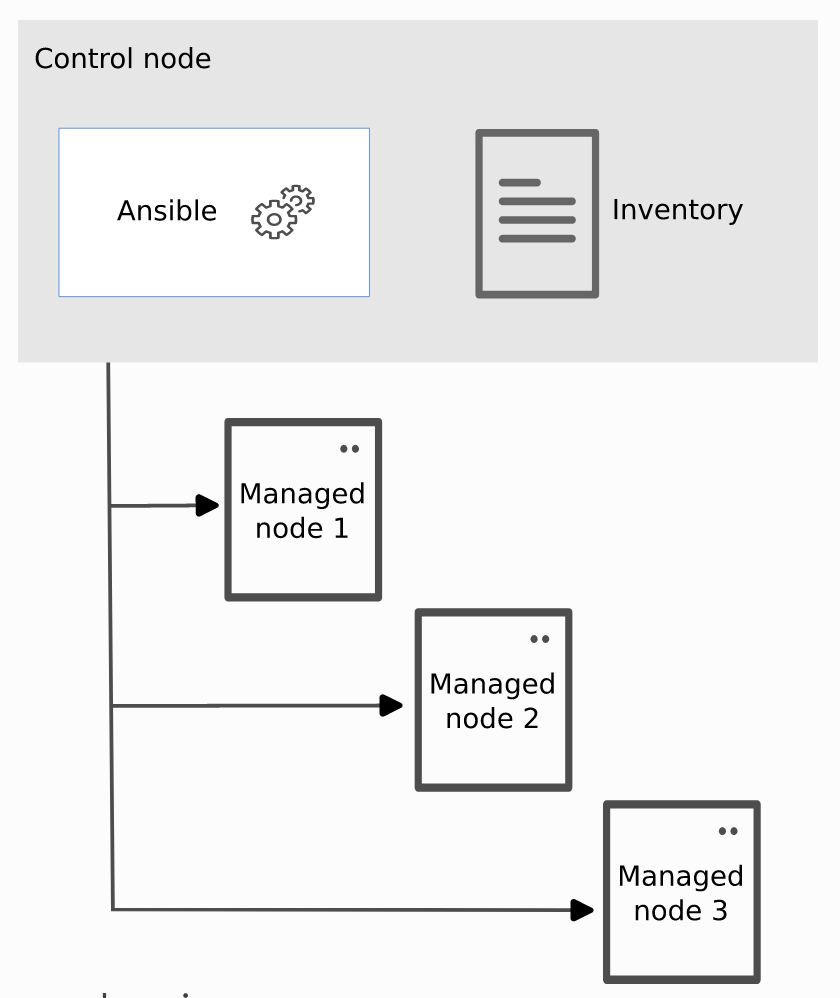
主要由3个组件构成:
- 控制节点: 用于安装和运行ansible。
- 被控制节点: ansible管理的节点。
- 清单(Inventory):按逻辑组织的被控制节点列表,它描述了ansible管理的对象。
Ansible的安装配置步骤:
使用Homebrew安装:
brew install ansible创建被管理节点的清单hosts.yaml
1
2
3
4
5
6
7
8
9
10
11
12
all:
children:
master:
hosts:
master-node:
ansible_host: 52.118.108.104
ansible_user: root
nodes:
hosts:
node-1:
ansible_host: 150.238.65.205
ansible_user: root检验清单是否正确。-i用于指定清单文件,all和master是被管理节点的模式(pattern)。
1
2
3
4
5
6
7
$ ansible -i hosts.yaml all --list-host
hosts (2):
master-node
node-1
$ ansible -i hosts.yaml master --list-host
hosts (1):
master-node配置SSH免密码登录,让控制节点可以远程连接到被管理节点。
检验SSH是否配置正确
1
2
3
4
5
6
7
8
9
10
11
12
13
14
15
$ansible -i hosts.yaml all -m ping
master-node | SUCCESS => {
"ansible_facts": {
"discovered_interpreter_python": "/usr/bin/python3"
},
"changed": false,
"ping": "pong"
}
node-1 | SUCCESS => {
"ansible_facts": {
"discovered_interpreter_python": "/usr/bin/python"
},
"changed": false,
"ping": "pong"
}
如何写一个Ansible清单?
- Inventory支持多种文件格式,最常用的两种是INI和YAML。
- 可以对清单中的节点分组(group),系统有两个默认分组
all和ungrouped。 - 可以使用children来嵌套分组。
1
2
3
4
5
6
7
8
9
10
11
12
13
14
15
16
all:
children:
master:
hosts:
master-node:
ansible_host: 52.118.108.104
ansible_user: root
nodes:
hosts:
node-1:
ansible_host: 150.238.65.205
ansible_user: root
prod:
children:
master:
nodes:1
2
3
4$ ansible -i hosts.yaml prod --list-hosts
hosts (2):
master-node
node-1 - 可以使用类似于python切片的语法来指定被控制节点的范围
1
2
3pod1:
hosts:
9.1.1.[1:10:2]1
2
3
4
5
6
7$ ansible -i range.yaml pod1 --list-hosts
hosts (5):
9.1.1.1
9.1.1.3
9.1.1.5
9.1.1.7
9.1.1.9
如何使用变量?
- 变量名和python的命名规则相同,由字母数字下划线组成且不能以数字开头,不能是python或者ansible的关键字。
- 使用yaml风格定义变量
- 变量作用范围为global,play,host
- 可以在task中使用register将输出赋值给变量
如何在清单中添加变量?
- 给一个节点添加变量,可以直接在节点下添加键值对,如上述hosts.yaml中的
ansible_host和ansible_user。 - 给一个group添加变量,可以在group下面添加vars字段。
1
2
3
4
5
6
7
8
9
10
11
12
13
14
15
16
17
18all:
children:
master:
hosts:
master-node:
ansible_host: 52.118.108.104
ansible_user: root
nodes:
hosts:
node-1:
ansible_host: 150.238.65.205
ansible_user: root
vars:
ntp_server: 9.1.1.1
prod:
children:
master:
nodes:1
2
3
4
5
6$ ansible -i hosts.yaml master -a "echo {{ ntp_server }}"
master-node | FAILED | rc=-1 >>
The task includes an option with an undefined variable. The error was: 'ntp_server' is undefined. 'ntp_server' is undefined
$ ansible -i hosts.yaml nodes -a "echo {{ ntp_server }}"
node-1 | CHANGED | rc=0 >>
9.1.1.1 - 也可以在清单文件同目录下创建
group_vars/{{group_name}}文件来给group定义变量。1
2
3
4
5
6$ cat group_vars/master
---
ftp_server: 9.1.1.1
$ ansible -i hosts.yaml master -a "echo {{ ftp_server }}"
master-node | CHANGED | rc=0 >>
9.1.1.1
如何使用模式来匹配目标主机?
模式(Pattern)可以通过通配符或者正则表达式来指定一个主机、IP、或者清单组(group)。
all或者*匹配所有主机- 主机或者group名匹配一个主机或者一个group
- 可以用
:或者,指定多个主机或group group1:!group2匹配在group1中且不在group2中的主机group1:&group2匹配既在group1又在group2中的主机
如何如何执行临时命令?
可以使用下面的命令来执行临时命令:
1 | $ ansible [pattern] -m [module] -a "[module options]" |
如果不指定-m [module],ansible会使用默认的command模块,module options就是要执行的命令。
1 | $ ansible -i hosts.yaml master -a 'ls $HOME' |
使用file模块来创建一个目录:
1 | $ ansible -i hosts.yaml master -m ansible.builtin.file -a "dest=/root/projects mode=755 owner=root group=root state=directory" |
jinja2是什么?
jinja2是一种模板语言,通常用于web后端渲染HTML页面,但它可以处理所有格式的文本文件。
Template + data = HTML
1 |
|
jinja的三种语句:
{% ... %}for Statements{{ ... }}for Expressions to print to the template output{# ... #}for Comments not included in the template output
jinja的过滤器filters:
1 | {{ name|striptags|title }} |
过滤器相当于一个把变量name当做参数的纯函数组合,上述过滤器就相当于函数调用title(striptags(name))。
Ansible playbooks是什么?
前面介绍的临时命令并不能满足复杂的部署任务,利用可重复使用、配置简单的ansible playbook就可以实现复杂的多机部署任务。利用playbook,用户可以:
- 声明配置。
- 编排在多机上执行的任务的步骤及顺序。
- 同步或者异步地执行这些任务。
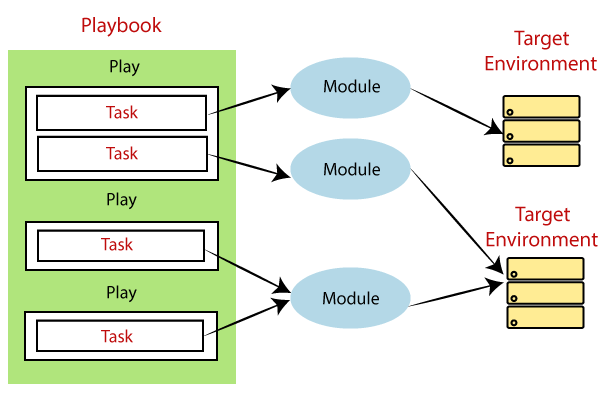
Ansible playbook由一个或者多个play组成,并按照从上到下的顺序执行,每个play至少包含两个部分:
- 用pattern来指定被管理的机器。
- 要执行的任务(task)。
Ansible playbook有如下特点:
- 在匹配的主机上,默认按顺序执行定义的任务,一次执行一个。
- 每个任务用指定的参数来执行一个ansible模块(module)。
- 如果任务在某个主机上失败,ansible则不会在该主机上执行接下来的所有任务。
- 大多数的ansible模块会检查机器的状态是否已经满足了module定义的状态,如果已经满足,则退出任务的执行。所以ansible模块的执行是幂等的。
- task可以用block组织起来,然后利用
rescue和always做异常处理。类似于try...except...finally。
Ansible playbook的相关命令:
$ ansible-playbook playbook.yaml -f 10: Fork出10个子进程来执行playbook中定义的任务。$ ansible-lint playbook.yaml: 检查playbook的定义。
例如,用ansible playbook来列出主机上家目录下的文件:
1 | ### playbook.yaml |
1 | $ ansible-playbook -i hosts.yaml playbook.yaml -f 10 |
如何在playbook中使用过滤器?
- 处理未定义的变量
{{ some_var | default('admin', true) }}: 给some_var设置默认值为’admin’,true表示some_var是false或者空字符串的时候也使用默认值。{{ mode | default(omit) }}: 如果mode没有定义就忽略它,直接使用系统的默认值。{{ some_var | mandatory }}: 如果some_var没有定义,则ansible会执行失败。
- 根据变量的值是true/false/null来返回不同的结果, 如
{{ enabled | ternary('no shutdown', 'shutdown', omit) }} - 使用过滤器
type_debug,dict2items及items2dict来获取或改变数据类型。1
2
3
4
5
6
7
8
9
10
11
12
13
14
15
16
17
18
19
20
21
22
23
24
25
26
27
28# playbook filters.yaml
- name: Example for list to dict
hosts: local
gather_facts: no
vars:
colors:
- fruit: apple
color: red
- fruit: pear
color: yellow
- fruit: grapefruit
color: yellow
tasks:
- name: Print dict
ansible.builtin.debug:
msg: "{{ colors | items2dict(key_name='fruit', value_name='color') | string }}" # "{'apple': 'red', 'pear': 'yellow', 'grapefruit': 'yellow'}"
- name: Example for dict to list
hosts: local
gather_facts: no
vars:
fruits:
apple: red
pear: yellow
grapefruit: yellow
tasks:
- name: Print list
ansible.builtin.debug:
msg: "{{ fruits | dict2items(key_name='fruit', value_name='color') | string }}" # "[{'fruit': 'apple', 'color': 'red'}, {'fruit': 'pear', 'color': 'yellow'}, {'fruit': 'grapefruit', 'color': 'yellow'}]" - 强制类型转换。
{{ some_var | bool }},{{ some_var | to_json }},{{ some_var | to_nice_yaml(indent=4) }}1
2
3
4
5
6
7
8
9
10
11
12
13
14
15
16
17
18
19# playbook: filters.yaml
- name: Example for to_json, to_nice_json and from_json
hosts: local
gather_facts: no
vars:
fruits:
apple: red
pear: yellow
grapefruit: yellow
tasks:
- name: Print to_json
ansible.builtin.debug:
msg: "{{ fruits | to_json}}"
- name: Print to_nice_json
ansible.builtin.debug:
msg: "{{ fruits | to_nice_json}}"
- name: Print from_json
ansible.builtin.debug:
msg: "{{ fruits | to_nice_json | from_json}}"1
2
3
4
5
6
7
8
9
10
11
12
13ok: [localhost] => {
"msg": "{\"apple\": \"red\", \"pear\": \"yellow\", \"grapefruit\": \"yellow\"}"
}
ok: [localhost] => {
"msg": "{\n \"apple\": \"red\",\n \"grapefruit\": \"yellow\",\n \"pear\": \"yellow\"\n}"
}
ok: [localhost] => {
"msg": {
"apple": "red",
"grapefruit": "yellow",
"pear": "yellow"
}
} - 使用
zip,zip_longest合并列表。1
2
3
4
5
6
7
8
9
10
11
12
13# filters.yaml
- name: Example for zip, zip_longest
hosts: local
gather_facts: no
vars:
indexes: [0, 1, 2, 3]
tasks:
- name: Print list with zip.
debug:
msg: "{{ indexes | zip(['a', 'b', 'c', 'd']) | string }}" # "[(0, 'a'), (1, 'b'), (2, 'c'), (3, 'd')]"
- name: Print list with zip_longest.
debug:
msg: "{{ indexes | zip_longest(['a'], fillvalue='x') | string }}" # "[(0, 'a'), (1, 'x'), (2, 'x'), (3, 'x')]" - 使用
subelements合并对象本身及其子元素。1
2
3
4
5
6
7
8
9
10
11
12
13
14
15# filters.yaml
- name: Example for zip, zip_longest
hosts: local
gather_facts: no
vars:
users:
- name: Han Meimei
roles: ['developer', 'tester', 'sre']
- name: Li lei
roles: ['developer']
tasks:
- name: Print combined msg.
debug:
msg: "{{ item.0.name }} is a {{ item.1 }}."
loop: "{{ users | subelements('roles') }}"1
2
3
4
5
6
7
8
9
10
11
12ok: [localhost] => (item=[{'name': 'Han Meimei', 'roles': ['developer', 'tester', 'sre']}, 'developer']) => {
"msg": "Han Meimei is a developer."
}
ok: [localhost] => (item=[{'name': 'Han Meimei', 'roles': ['developer', 'tester', 'sre']}, 'tester']) => {
"msg": "Han Meimei is a tester."
}
ok: [localhost] => (item=[{'name': 'Han Meimei', 'roles': ['developer', 'tester', 'sre']}, 'sre']) => {
"msg": "Han Meimei is a sre."
}
ok: [localhost] => (item=[{'name': 'Li lei', 'roles': ['developer']}, 'developer']) => {
"msg": "Li lei is a developer."
} - 使用
combine来合并字典。1
2
3
4
5
6
7
8
9
10
11
12
13
14#filters.yaml
- name: Example for combine
hosts: local
gather_facts: no
vars:
user:
name: Han Meimei
roles: ['developer', 'tester', 'sre']
scores:
math: 100
tasks:
- name: Print combined user.
debug:
msg: "{{ user | combine({ 'roles': ['designer', 'sre'], 'scores': { 'english': 80 } }, list_merge='append_rp', recursive=True) | from_yaml }}"1
2
3
4
5
6
7
8
9
10
11
12
13
14
15ok: [localhost] => {
"msg": {
"name": "Han Meimei",
"roles": [
"developer",
"tester",
"designer",
"sre"
],
"scores": {
"english": 80,
"math": 100
}
}
} - 使用
map从列表或字典中抽取数据。1
2
3
4
5
6
7
8
9
10
11#filters.yaml
- name: Example for map
hosts: local
gather_facts: no
tasks:
- name: Print list.
debug:
msg: "{{ [0,2] | map('extract', ['x','y','z']) | list | string }}" # "['x', 'z']"
- name: Print dict.
debug:
msg: "{{ ['x','y'] | map('extract', {'x': 42, 'y': 31}) | list | string }}" # "[42, 31]" - 使用
ansible.builtin.permutations和ansible.builtin.combinations来获取列表的排列与组合。 - 使用
product来获取两个列表的笛卡尔积。 - 使用
json_query来获取json的子元素。1
2
3
4
5
6
7
8
9
10
11
12
13
14
15
16
17
18
19
20
21
22
23
24
25
26
27
28
29
30
31
32
33
34
35
36
37
38
39
40
41
42
43
44
45
46
47
48
49
50
51
52
53
54
55
56
57
58
59
60#filters.yaml
- name: Example for json_query
hosts: local
gather_facts: no
vars:
"domain_definition": {
"domain": {
"cluster": [
{
"name": "cluster1"
},
{
"name": "cluster2"
}
],
"server": [
{
"name": "server11",
"cluster": "cluster1",
"port": "8080"
},
{
"name": "server12",
"cluster": "cluster1",
"port": "8090"
},
{
"name": "server21",
"cluster": "cluster2",
"port": "9080"
},
{
"name": "server22",
"cluster": "cluster2",
"port": "9090"
}
],
"library": [
{
"name": "lib1",
"target": "cluster1"
},
{
"name": "lib2",
"target": "cluster2"
}
]
}
}
tasks:
- debug:
msg: "{{ domain_definition | json_query('domain.cluster[*].name') | string }}" # "['cluster1', 'cluster2']"
- debug:
msg: "{{ domain_definition | json_query('domain.server[?cluster==`cluster1`].port') | string }}" # "['8080', '8090']"
- debug:
msg: "{{ domain_definition | json_query('domain.server[?cluster==`cluster2`].{name: name, port: port}') | string }}" # "[{'name': 'server21', 'port': '9080'}, {'name': 'server22', 'port': '9090'}]"
- debug:
msg: "{{ domain_definition | json_query('domain.server[?starts_with(name, `server1`)].port') | string }}" # "['8080', '8090']"
- debug:
msg: "{{ domain_definition | json_query('domain.server[?contains(name, `server1`)].port') | string }}" # "['8080', '8090']" - 用
random生成随机数。1
2
3
4
5
6
7
8
9
10
11
12
13
14
15#filters.yaml
- name: Example for random
hosts: local
gather_facts: no
tasks:
- debug:
msg: "{{ ['a','b','c'] | random }}" # "msg": "a"
- debug:
msg: "{{ 60 | random }}" # "msg": "39"
- debug:
msg: "{{ 101 | random(step=10) }}" # "msg": "80"
- debug:
msg: "{{ 101 | random(start=1, step=10) }}" # "msg": "21"
- debug:
msg: "{{ 60 | random(seed=inventory_hostname) }}" # "msg": "42" - 用
shuffle可以打乱列表。{{ ['a','b','c'] | shuffle(seed=inventory_hostname) }} - 用
max,min,flatten处理列表。1
2
3
4
5
6
7
8
9
10
11
12
13
14
15
16
17#filters.yaml
- name: Example for list management
hosts: local
gather_facts: no
vars:
nums: [1, 2, 3]
nested_nums: [1, 2, 3, [4, 5]]
dict_list: [{'val': 1}, {'val': 2}]
tasks:
- debug:
msg: "{{ nums | min }}" # "1"
- debug:
msg: "{{ nums | max }}" # "3"
- debug:
msg: "{{ dict_list | max(attribute='val') | string }}" # "{'val': 2}"
- debug:
msg: "{{ nested_nums | flatten(levels=1) | string }}" # "[1, 2, 3, 4, 5]" - 使用
unique,union,intersect,difference,symmetric_difference给列表做集合运算。1
2
3
4
5
6
7
8
9
10
11
12
13
14
15
16
17
18#filters.yaml
- name: Example for sets
hosts: local
gather_facts: no
vars:
list1: [1, 2, 3, 4, 5, 5, 4]
list2: [1, 2, 6, 7, 8]
tasks:
- debug:
msg: "{{ list1 | unique | string }}" # "[1, 2, 3, 4, 5]"
- debug:
msg: "{{ list1 | union(list2) | string }}" # "[1, 2, 3, 4, 5, 6, 7, 8]"
- debug:
msg: "{{ list1 | intersect(list2) | string }}" # "[1, 2]"
- debug:
msg: "{{ list1 | difference(list2) | string }}" # "[3, 4, 5]"
- debug:
msg: "{{ list1 | symmetric_difference(list2) | string }}" # "[3, 4, 5, 6, 7, 8]" - 使用
ipaddr,ipv4,ipv6处理IP地址。1
2
3
4
5
6
7
8
9
10
11
12
13
14
15
16
17
18
19
20
21
22
23
24
25
26#filters.yaml
- name: Example for IP address
hosts: local
gather_facts: no
vars:
s: "hello9.128.1.1world"
invalid_ip: "9.1.1.314"
ip: "127.0.0.1"
cidr: "192.0.2.1/24"
tasks:
- debug:
msg: "{{ s | ansible.utils.ipaddr }}" # false
- debug:
msg: "{{ s | ansible.utils.ipv4 }}" # false
- debug:
msg: "{{ s | ansible.utils.ipv6 }}" # false
- debug:
msg: "{{ s | ansible.utils.ipaddr('address') }}" # false
- debug:
msg: "{{ invalid_ip | ansible.utils.ipaddr }}" # false
- debug:
msg: "{{ cidr | ansible.utils.ipaddr('address') }}" # "192.0.2.1"
- debug:
msg: "{{ ip | ansible.utils.ipv4 }}" # "127.0.0.1"
- debug:
msg: "{{ ip | ansible.utils.ipaddr('address') }}" # "127.0.0.1" - 使用
hash,checksum,password_hash加密字符串和密码。1
2
3
4
5
6
7
8
9
10
11
12
13
14
15
16
17# playbook filters.yaml
- name: Example for hash, checksum, password_hash
hosts: local
gather_facts: no
vars:
pwd: "pass4root"
tasks:
- debug:
msg: "{{ pwd | hash('sha1') }}" # "0754b1729f43eb5e37007610e28a47bd60531b97"
- debug:
msg: "{{ pwd | hash('md5') }}" # "f2feffd19d83fdac11a2e29c3e4d7fc6"
- debug:
msg: "{{ pwd | checksum }}" # "0754b1729f43eb5e37007610e28a47bd60531b97"
- debug:
msg: "{{ pwd | password_hash('sha512') }}" # "$6$rounds=656000$p3CTKl4HE5zC297h$/7MyWoqFwsug5n0aFaGh3CK2utVkxiuJW5wc04obh/NPPN2YiHe.XHlh4E/QXm4zNkR4zUg4zQEwzSCX03cLt/"
- debug:
msg: "{{ pwd | password_hash('sha256', 'mysecretsalt') }}" # "$5$rounds=535000$mysecretsalt$UXdCeKTnnbG1O6cMAPkfEve5t17.eExAsSfxGYmd7H/" - 使用
comment,urlencode,urlsplit处理字符串。1
2
3
4
5
6
7
8
9
10
11
12
13
14
15
16
17
18
19# playbook filters.yaml
- name: Example for `comment`, `urlencode`, `urlsplit`
hosts: local
gather_facts: no
vars:
s: "hello world"
url: "http://user:password@www.example.com:9000/dir/index.html?query=term#fragment"
crn: "crn:v2:bluemix:uuid:a/accountid"
tasks:
- debug:
msg: "{{ s | comment(decoration='# ', prefix='######', postfix='######') }}" # "######\n# hello world\n######"
- debug:
msg: "{{ s | comment('xml') }}" # "<!--\n -\n - hello world\n -\n-->"
- debug:
msg: "{{ crn | urlencode }}" # "crn%3Av2%3Abluemix%3Auuid%3Aa/accountid"
- debug:
msg: "{{ url | urlsplit('hostname') }}" # "www.example.com"
- debug:
msg: "{{ url | urlsplit | string }}" # "{'fragment': 'fragment', 'hostname': 'www.example.com', 'netloc': 'user:password@www.example.com:9000', 'password': 'password', 'path': '/dir/index.html', 'port': 9000, 'query': 'query=term', 'scheme': 'http', 'username': 'user'}" - 使用
regex_search,regex_findall,regex_replace,regex_escape处理字符串。1
2
3
4
5
6
7
8
9
10
11
12
13
14
15
16
17
18
19
20
21
22
23
24
25
26
27# playbook filters.yaml
- name: Example for `regex_search`, `regex_findall`, `regex_replace`, `regex_escape`
hosts: local
gather_facts: no
tasks:
- debug:
msg: "{{ 'server1/database42' | regex_search('database[0-9]+') }}" # "database42"
- debug:
msg: "{{ 'foo\nBAR' | regex_search('^bar', multiline=True, ignorecase=True) }}" # "BAR"
- debug:
msg: "{{ 'server1/database42' | regex_search('server([0-9]+)/database([0-9]+)', '\\1', '\\2') | string }}" # "['1', '42']"
- debug:
msg: "{{ '21/42' | regex_search('(?P<dividend>[0-9]+)/(?P<divisor>[0-9]+)', '\\g<dividend>', '\\g<divisor>') | string }}" # "['21', '42']"
- debug:
msg: "{{ 'ansible' | regex_search('foobar') }}" # ''
- debug:
msg: "{{ 'ansible' | regex_search('foobar') == '' }}" # False
- debug:
msg: "{{ 'ansible' | regex_search('foobar') is none }}" # True
- debug:
msg: "{{ 'CAR\ntar\nfoo\nbar\n' | regex_findall('^.ar$', multiline=True, ignorecase=True) | string }}" # "['CAR', 'tar', 'bar']"
- debug:
msg: "{{ 'localhost:80' | regex_replace('^(?P<host>.+):(?P<port>\\d+)$', '\\g<host>, \\g<port>') }}" # 'localhost, 80'
- debug:
msg: "{{ '^f.*o(.*)$' | regex_escape() }}" # "\\^f\\.\\*o\\(\\.\\*\\)\\$"
- 使用
basename,dirname,expanduser,expandvars,realpath,relpath,splitext,first,last,path_join处理文件路径。1
2
3
4
5
6
7
8
9
10
11
12
13
14
15
16
17
18
19
20
21
22
23
24
25# playbook filters.yaml
- name: Example for `basename`, `dirname`, `expanduser`, `expandvars`, `realpath`, `relpath`, `splitext`, `first`, `last`, `path_join`
hosts: local
gather_facts: no
vars:
path: ~/sen/a.txt
tasks:
- debug:
msg: "{{ path | basename }}" # "a.txt"
- debug:
msg: "{{ path | dirname }}" # "~/sen"
- debug:
msg: "{{ path | expanduser }}" # "/Users/senwang/sen/a.txt"
- debug:
msg: "{{ path | expandvars }}" # "~/sen/a.txt"
- debug:
msg: "{{ path | realpath }}" # "/Users/senwang/tools/ansible/~/sen/a.txt"
- debug:
msg: "{{ path | relpath('/etc') }}" # "../Users/senwang/tools/ansible/~/sen/a.txt"
- debug:
msg: "{{ path | splitext }}" # "('~/sen/a', '.txt')"
- debug:
msg: "{{ path | splitext | first }}" # "~/sen/a"
- debug:
msg: "{{ ('/etc', 'dir', 'subdir', 'a.txt') | path_join }}" # "/etc/dir/subdir/a.txt" - 使用
join,split,b64decode,b64encode处理字符串。1
2
3
4
5
6
7
8
9
10
11
12
13# playbook filters.yaml
- name: Example for `join`, `split`, `b64decode`, `b64encode`
hosts: local
gather_facts: no
vars:
types: ['int', 'string', 'list', 'dict']
tasks:
- debug:
msg: "{{ types | join(',') }}" # "int,string,list,dict"
- debug:
msg: "{{ types | join(',') | split(',') | string }}" # "['int', 'string', 'list', 'dict']"
- debug:
msg: "{{ 'hello world' | b64encode | b64decode }}" # "hello world" - 使用
to_uuid处理UUID。1
2
3
4
5
6- name: Example for `to_uuid`
hosts: local
gather_facts: no
tasks:
- debug:
msg: "{{ 'string' | to_uuid }}" # "c7e8b99c-6668-5b4d-bdf9-26f4c0da60e5" - 使用
to_datetime,strftime处理时间和日期。1
2
3
4
5
6
7
8
9
10
11
12
13
14
15
16
17# playbook filters.yaml
- name: Example for `to_datetime`, `strftime`
hosts: local
gather_facts: no
tasks:
- debug:
msg: "{{ (('2016-08-14 20:00:12' | to_datetime) - ('2015-12-25' | to_datetime('%Y-%m-%d'))).total_seconds() }}" # "20203212.0"
- debug:
msg: '{{ (("2016-08-14 20:00:12" | to_datetime) - ("2016-08-14 18:00:00" | to_datetime)).seconds }}' # "7212"
- debug:
msg: '{{ (("2016-08-14 20:00:12" | to_datetime) - ("2015-12-25" | to_datetime("%Y-%m-%d"))).days }}' # "233"
- debug:
msg: "{{ '%H:%M:%S' | strftime }}" # "19:42:01"
- debug:
msg: "{{ '%Y-%m-%d %H:%M:%S' | strftime(0) }}" # "1970-01-01 08:00:00"
- debug:
msg: "{{ '%Y-%m-%d' | strftime(1441357287) }}" # "2015-09-04"
如何在受控节点上以其他用户的身份执行命令?
可以在play或者task上通过以下配置切换用户身份来执行play或者task。
become: 设置为yes启用用户切换。become_user: 指定要切换的用户名,如果不指定默认为root用户。become_method: 指定become要使用的插件,如su, sudo等。
也可以在清单中为group或者节点设置become。
ansible_becomeansible_become_useransible_become_passwordansible_become_method
如何在playbook中使用循环
- 使用
loop遍历简单列表。1
2
3
4
5
6
7
8
9
10
11# playbook.yaml
- name: List users
hosts: local
gather_facts: no
tasks:
- name: Show item.
debug:
msg: "{{ item }}"
loop:
- user1
- user2 - 使用
loop遍历字典列表。1
2
3
4
5
6
7
8- name: Add several users
ansible.builtin.user:
name: "{{ item.name }}"
state: present
groups: "{{ item.groups }}"
loop:
- { name: 'testuser1', groups: 'wheel' }
- { name: 'testuser2', groups: 'root' } - 使用
loop和dict2items遍历字典。1
2
3
4
5
6
7
8
9
10
11
12- name: Example for loop dict
hosts: local
gather_facts: no
tasks:
- name: Using dict2items
ansible.builtin.debug:
msg: "{{ item.key }} - {{ item.value }}"
loop: "{{ tag_data | dict2items }}"
vars:
tag_data:
Environment: dev
Application: payment1
2
3
4
5
6ok: [localhost] => (item={'key': 'Environment', 'value': 'dev'}) => {
"msg": "Environment - dev"
}
ok: [localhost] => (item={'key': 'Application', 'value': 'payment'}) => {
"msg": "Application - payment"
} - 使用
register将loop的结果保存到变量。1
2
3
4
5
6
7
8
9
10
11
12
13- name: Example for loop register
hosts: local
gather_facts: no
tasks:
- name: Register loop output as a variable
ansible.builtin.shell: "echo {{ item }}"
loop:
- "one"
- "two"
register: echo
- name: Print echo
debug:
var: echo1
2
3
4
5
6
7
8
9
10
11
12
13
14
15
16
17
18
19
20
21
22
23
24
25
26
27
28
29
30
31
32
33
34
35
36
37
38
39
40
41
42
43
44
45
46
47
48
49
50
51
52
53
54
55
56
57
58
59
60
61
62
63
64
65
66
67
68
69
70
71
72
73
74
75
76
77
78
79
80
81ok: [localhost] => {
"echo": {
"changed": true,
"msg": "All items completed",
"results": [
{
"ansible_facts": {
"discovered_interpreter_python": "/opt/homebrew/bin/python3.10"
},
"ansible_loop_var": "item",
"changed": true,
"cmd": "echo one",
"delta": "0:00:00.007707",
"end": "2022-11-20 20:24:53.768577",
"failed": false,
"invocation": {
"module_args": {
"_raw_params": "echo one",
"_uses_shell": true,
"argv": null,
"chdir": null,
"creates": null,
"executable": null,
"removes": null,
"stdin": null,
"stdin_add_newline": true,
"strip_empty_ends": true,
"warn": false
}
},
"item": "one",
"msg": "",
"rc": 0,
"start": "2022-11-20 20:24:53.760870",
"stderr": "",
"stderr_lines": [],
"stdout": "one",
"stdout_lines": [
"one"
]
},
{
"ansible_loop_var": "item",
"changed": true,
"cmd": "echo two",
"delta": "0:00:00.007317",
"end": "2022-11-20 20:24:53.973643",
"failed": false,
"invocation": {
"module_args": {
"_raw_params": "echo two",
"_uses_shell": true,
"argv": null,
"chdir": null,
"creates": null,
"executable": null,
"removes": null,
"stdin": null,
"stdin_add_newline": true,
"strip_empty_ends": true,
"warn": false
}
},
"item": "two",
"msg": "",
"rc": 0,
"start": "2022-11-20 20:24:53.966326",
"stderr": "",
"stderr_lines": [],
"stdout": "two",
"stdout_lines": [
"two"
]
}
],
"skipped": false,
"warnings": [
"Platform darwin on host localhost is using the discovered Python interpreter at /opt/homebrew/bin/python3.10, but future installation of another Python interpreter could change the meaning of that path. See https://docs.ansible.com/ansible-core/2.13/reference_appendices/interpreter_discovery.html for more information."
]
}
} - 使用
until重试任务直到满足特定条件。1
2
3
4
5
6- name: Retry a task until a certain condition is met
ansible.builtin.shell: /usr/bin/foo
register: result
until: result.stdout.find("all systems go") != -1
retries: 5
delay: 10 - 使用
loop遍历清单。query返回一个列表,lookup默认返回字符串,所以需要指定wantlist=True。1
2loop: "{{ query('inventory_hostnames', 'all') }}"
loop: "{{ lookup('inventory_hostnames', 'all', wantlist=True) }}"1
2
3
4
5
6
7
8
9
10
11
12
13
14
15
16
17- name: Example for loop register
hosts: local
gather_facts: no
tasks:
- name: Show all the hosts in the inventory
ansible.builtin.debug:
msg: "{{ item }}"
loop: "{{ groups['all'] }}"
- name: Show all the hosts in the current play
ansible.builtin.debug:
msg: "{{ item }}"
loop: "{{ ansible_play_batch }}"
- name: Show all the hosts in the inventory
ansible.builtin.debug:
msg: "{{ item }}"
loop: "{{ query('inventory_hostnames', 'all') }}"1
2
3
4
5
6
7
8
9
10
11
12
13
14
15
16
17
18
19
20
21
22
23
24
25
26TASK [Show all the hosts in the inventory]
ok: [localhost] => (item=master-node) => {
"msg": "master-node"
}
ok: [localhost] => (item=node-1) => {
"msg": "node-1"
}
ok: [localhost] => (item=localhost) => {
"msg": "localhost"
}
TASK [Show all the hosts in the current play]
ok: [localhost] => (item=localhost) => {
"msg": "localhost"
}
TASK [Show all the hosts in the inventory]
ok: [localhost] => (item=master-node) => {
"msg": "master-node"
}
ok: [localhost] => (item=node-1) => {
"msg": "node-1"
}
ok: [localhost] => (item=localhost) => {
"msg": "localhost"
} - 使用
loop_control。1
2
3
4
5
6
7
8
9
10
11
12
13- name: Example for loop register
hosts: local
gather_facts: no
tasks:
- name: Show all the hosts in the inventory
ansible.builtin.debug:
msg: "{{ it }}"
loop: "{{ groups['all'] }}"
loop_control:
loop_var: it
index_var: i
label: "{{ i }}"
pause: 3
如何在playbook中使用条件判断语句?
- 可以使用
when为task指定执行条件。1
2
3
4
5
6
7
8
9
10
11- name: Example for when
hosts: all
gather_facts: no
tasks:
- name: list all files/dirs in $HOME directory.
command: ls ~
register: result
- name: print result
debug:
var: result.stdout_lines
when: result.stdout_lines | length > 51
2
3
4
5
6
7
8
9
10
11
12
13
14
15
16
17
18TASK [list all files/dirs in $HOME directory.]
changed: [localhost]
changed: [node-1]
changed: [master-node]
skipping: [master-node]
skipping: [node-1]
ok: [localhost] => {
"result.stdout_lines": [
"Desktop",
"Documents",
"Downloads",
"Library",
"Movies",
"Music",
...
]
} - 也可以使用
when来根据前一个任务的状态做不同的处理。1
2
3
4
5
6
7
8
9
10
11
12
13
14
15
16
17
18
19
20
21
22
23
24- name: Example for when
hosts: all
gather_facts: no
tasks:
- name: list all files/dirs in $HOME directory.
command: ls ~
register: result
- name: print result
debug:
var: result.stdout_lines
when: result.stdout_lines | length > 5
register: r
- name: print succeeded
debug:
msg: "Task on {{ inventory_hostname }} succeeded."
when: r is succeeded
- name: print failed
debug:
msg: "Task on {{ inventory_hostname }} failed."
when: r is failed
- name: print skipped
debug:
msg: "Task on {{ inventory_hostname }} skipped."
when: r is skipped1
2
3
4
5
6
7
8
9
10
11
12
13
14
15
16
17
18
19
20
21
22
23
24
25
26
27
28
29
30
31
32
33
34
35
36
37
38
39
40
41
42
43
44
45
46
47
48
49
50
51TASK [list all files/dirs in $HOME directory.]
changed: [localhost]
changed: [node-1]
changed: [master-node]
TASK [print result]
skipping: [master-node]
ok: [localhost] => {
"result.stdout_lines": [
"Desktop",
"Documents",
"Downloads",
"Library",
"Movies",
"Music",
"Pictures",
"Public",
"data",
"go",
"projects",
"sdk",
"tmp",
"tools",
"vpc"
]
}
skipping: [node-1]
ok: [master-node] => {
"msg": "Task on master-node succeeded."
}
ok: [node-1] => {
"msg": "Task on node-1 succeeded."
}
ok: [localhost] => {
"msg": "Task on localhost succeeded."
}
TASK [print failed]
skipping: [master-node]
skipping: [node-1]
skipping: [localhost]
TASK [print skipped]
skipping: [localhost]
ok: [master-node] => {
"msg": "Task on master-node skipped."
}
ok: [node-1] => {
"msg": "Task on node-1 skipped."
} - 当
when和import_tasks: tasks.yaml一起使用时,tasks.yaml中的task也会判断when后面的条件。 - 当
when和include_tasks: tasks.yaml一起使用时,tasks.yaml中的task不会去做when判断。 - 常用的用于条件测试的facts:
fact description ansible_facts['distribution']操作系统发行版名称,如 Redhatansible_facts['distribution_major_version']操作系统发行版主版本号,如 16ansible_facts['os_family']操作系统发行版家族,如 Redhat,Debian等
如何写条件判断语句中测试?
- 语法:
variable is test_name例如:result is failed - 可以用
match,search,regex测试字符创。1
2
3
4
5
6
7
8
9
10
11
12
13
14
15
16
17
18
19- name: Example for string test
hosts: local
connection: localhost
gather_facts: no
vars:
url: "https://example.com/users/foo/resources/bar"
tasks:
- debug:
msg: "url not match: false." # "url not match: false."
when: url is not match("example.com/users/.*/resources") # 必须从字符串开始就匹配
- debug:
msg: "url match: true." # "url match: true."
when: url is match("https://example.com/users/.*/resources")
- debug:
msg: "url search: true." # "url search: true."
when: url is search("users/.*/resources/.*") # 不要求从字符串开始就匹配
- debug:
msg: "url regex: true" # "url regex: true"
when: url is regex("example\.com/\w+/foo") - 用
vault_encrypted测试变量是否vault的加密值。1
2
3
4
5
6
7
8
9$ ansible-vault encrypt_string --vault-id dev --ask-vault-password --output password.yaml "pass4root" --name passwd
$ cat password.yaml
passwd: !vault |
$ANSIBLE_VAULT;1.1;AES256
62343061653433353330663564333233356439306535663837346631393737646538626164366664
6532303034383336366530326438396536343232366131390a313863383336323838643863376663
61383561323338353031363861633032616135316638393139616161306538333563363038653665
3137616362386362380a643061326663396436393430343830653836636134626463613863613732
6539%1
2
3
4
5
6
7- name: Example for vault_encrypted
hosts: local
gather_facts: no
vars_files: password.yaml
tasks:
- debug:
msg: '{{ (passwd is vault_encrypted) | ternary("Vault encrypted", "Not vault encrypted") }}' # "Vault encrypted" - 用
truthy和falsy来判断布尔值。1
2
3
4
5
6
7
8
9
10
11
12- name: Example for truthy and falsy
hosts: local
gather_facts: no
tasks:
- debug:
msg: "{{ item }} is Truthy"
when: item is truthy(convert_bool=True)
loop: ["", 0, {}, [], "hello world", 1, {"key": "value"}, [1]]
- debug:
msg: "{{ item }} is Falsy"
when: item is falsy(convert_bool=True)
loop: ["", 0, {}, [], "hello world", 1, {"key": "value"}, [1]]1
2
3
4
5
6
7
8
9
10
11
12
13
14
15
16
17
18
19
20
21
22
23
24
25ok: [localhost] => (item=hello world) => {
"msg": "hello world is Truthy"
}
ok: [localhost] => (item=1) => {
"msg": "1 is Truthy"
}
ok: [localhost] => (item={'key': 'value'}) => {
"msg": "{'key': 'value'} is Truthy"
}
ok: [localhost] => (item=[1]) => {
"msg": "[1] is Truthy"
}
ok: [localhost] => (item=) => {
"msg": " is Falsy"
}
ok: [localhost] => (item=0) => {
"msg": "0 is Falsy"
}
ok: [localhost] => (item={}) => {
"msg": "{} is Falsy"
}
ok: [localhost] => (item=[]) => {
"msg": "[] is Falsy"
} - 使用
version比较版本号。可用的操作符包括<, lt, <=, le, >, gt, >=, ge, ==, =, eq, !=, <>, ne。1
2
3
4
5
6- name: Example for version
hosts: master
tasks:
- debug:
msg: "OS version {{ ansible_facts['distribution_version'] }} >= 1.0" # "OS version 22.04 >= 1.0"
when: ansible_facts['distribution_version'] is version('1.0', '>=') - 使用
superset和subset来比较集合。1
2
3
4
5
6
7
8
9
10
11
12
13
14- name: Example for superset and subset
hosts: local
gather_facts: no
vars:
a: [1,2,3,4,5]
b: [2,3]
tasks:
- debug:
msg: "A includes B" # "A includes B"
when: a is superset(b)
- debug:
msg: "B is included in A" # "B is included in A"
when: b is subset(a) - 使用
all和any判断列表里的值是否全部为truthy。1
2
3
4
5
6
7
8
9
10
11
12
13
14
15
16
17
18
19
20- name: Example for all and any
hosts: local
gather_facts: no
vars:
mylist:
- 1
- "{{ 3 == 3 }}"
- True
myotherlist:
- False
- True
tasks:
- debug:
msg: "all are true!" # "all are true!"
when: mylist is all
- debug:
msg: "at least one is true" # "at least one is true"
when: myotherlist is any - 使用
directory, file, link, exists, abs, same_file, mount来判断路径。 - 使用
human_readable和human_to_bytes转换字节数。1
2
3
4
5
6
7
8
9
10
11
12
13
14
15
16
17
18
19
20
21
22
23
24- name: Example for human_readable and human_to_bytes
hosts: local
gather_facts: no
tasks:
- name: "Human Readable"
assert: # "All assertions passed"
that:
- '"1.00 Bytes" == 1|human_readable'
- '"1.00 bits" == 1|human_readable(isbits=True)'
- '"10.00 KB" == 10240|human_readable'
- '"97.66 MB" == 102400000|human_readable'
- '"0.10 GB" == 102400000|human_readable(unit="G")'
- '"0.10 Gb" == 102400000|human_readable(isbits=True, unit="G")'
- name: "Human to Bytes"
assert: # "All assertions passed"
that:
- "{{'0'|human_to_bytes}} == 0"
- "{{'0.1'|human_to_bytes}} == 0"
- "{{'0.9'|human_to_bytes}} == 1"
- "{{'1'|human_to_bytes}} == 1"
- "{{'10.00 KB'|human_to_bytes}} == 10240"
- "{{ '11 MB'|human_to_bytes}} == 11534336"
- "{{ '1.1 GB'|human_to_bytes}} == 1181116006"
- "{{'10.00 Kb'|human_to_bytes(isbits=True)}} == 10240" - 使用
string, mapping, iterable, sequence, integer, number, float判断数据类型。
如何获取用户输入?
Ansible可以在play中用vars_prompt获取用户输入。
1 | - name: Example for vars_prompt |
1 | $ ansible-playbook -i hosts.yaml playbook.yaml |
什么是fact和magic variable?
fact:
- Ansible facts是保存受控节点的系统信息的变量。在playbook中可以使用
ansible_facts引用。 - 可以在play中使用
gather_facts: false来禁止搜集受控节点信息并赋值给ansible_facts。 - 可以在
/etc/ansible/facts.d/x.factini文件中设置自定义fact。然后用ansible_local.x.section.var来引用。
Ansible magic variables是ansible的内置变量,用于保存ansible自身的一些信息。
hostvars: 保存所有受控节点的信息。groups: 保存清单中所有的group信息。group_names: 保存当前节点所在的所有组的信息。inventory_hostname: 保存当前节点的主机名。ansible_play_hosts: 保存当前play中所有active的主机名。ansible_play_batch: 保存当前play中正在运行的一批主机名,主机的个数和serial一致。ansible_playbook_python: 保存用于调用ansible命令行的python可执行文件路径。inventory_dir: 保存清单文件所在目录的路径。playbook_dir: 保存playbook所在目录的路径。inventory_file: 保存清单文件的路径。role_path: 只能在role中引用,保存当前role的路径。ansible_check_mode: 是否在命令行中使用--check启用了check mode。
1 | - name: Example for magic variables. |
1 | $ ansible-playbook -i hosts.yaml playbook.yaml |
如何使用role?
role将变量、task、文件、handlers及其他的ansible元素以一定的目录结构组织起来,从而到达可重用及分享的目的。
role的目录结构如下:
- tasks/main.yml: role执行的task都放在该目录下。
- handlers/main.yml: 存放role的handlers。
- library/my_module.py: 存放自定义的module。
- defaults/main.yml: 存放默认变量。
- vars/main.yml: 存放其他变量。
- files/main.yml: 存放文件。
- templates/main.yml: 存放templates。
- meta/main.yml: 存放role的metadata,包括role的依赖以及Galaxy的metadata。role所依赖的其他role会在这里指定,并且优先于role定义的task执行。
- meta/argument_specs.yml: 如果role中有这个文件,那么在执行role时会先跑一个task来检查role的参数。
role必须包含至少一个上述的目录。
Ansible查找role的路径优先级如下:
- collection
- 和playbook同目录下的roles目录
- roles_path指定的目录。默认值为:
~/.ansible/roles:/usr/share/ansible/roles:/etc/ansible/roles - playbook同目录
用以下的方式引用role:
- play level使用
roles静态引入 - tasks level使用
include_role动态引入 - tasks level使用
import_role静态引入
引入role之后,play执行的顺序:
- play中定义的pre_tasks。
- pre_tasks notify的handlers。
- 定义在roles中的role按顺序执行。
- play定义的tasks。
- role和task notify的handlers。
- play中定义的post_tasks。
- post_tasks notify的handlers。
如何理解动态的include和静态的import?
playbook可以使用include动态地引入task,role和variable,也可使用import静态的引入playbook,role和task。
所谓静态,指的是ansible在运行开始就把被import的playbook/task/role引入playbook中,其task跟普通的task类似。而用include动态引入task/role,则是在执行到include的时候,用一个task将被引入的task/role引入进来。这样导致了import和include有如下区别。
| include | import | |
|---|---|---|
| 类型 | 动态 | 静态 |
| 处理时机 | 运行时遇到的时候处理 | 解析playbook的时候预处理 |
| 是否可以引入playbook | 只能引入task/role | 可以引入playbook |
| task的选项 | 只作用于该task | 作用于被引入的所有task |
| 是否可以用于loop | 可以 | 不可以 |
| –list-tags/–list-tasks | 被引入的task/tag不可见 | 可以列出 |
| notify handler | 被引入的handler/task只能被整体执行 | 可以单独notify被引入的某一个task/handler |
如何在受控节点之外的节点上运行task?
在task中使用delegate_to可以将task委派给其他的节点执行。
1 | - name: Example for delegate_to |
也可以使用local_action在控制节点上运行task。
1 | - name: Example for delegate_to |
ansible默认收集的是当前受控节点的facts,如果希望收集delegate_to节点的facts可以用delegate_facts: true设置。
如何使用handler?
- handler是一种特殊的task,它只有被别的task使用
notify通知且通知的task的状态为changed时才会运行。 - 可以使用
listen让多个handler监听同一个notify。 - handler通常只在一组task或者role之后运行一次,即使它被多次notify。
- 可以在task中使用
meta: flush_handlers提前运行handler。1
2
3
4
5
6
7
8
9
10
11
12
13
14
15
16
17- name: Example for handler
hosts: local
gather_facts: no
vars:
file_name: "a.txt"
tasks:
- name: Create a new file.
file:
path: "~/{{ file_name }}"
state: touch
notify:
- Print file created
handlers:
- name: Print file created
debug:
msg: "File {{ file_name }} created." # File a.txt created.
listen: Print message
如何处理错误?
- 一个task在某个节点执行失败后(状态为failed),后续的task也不会在该节点上执行了。 可以使用
ignore_errors: true来继续执行后续的task。 - 使用
ignore_unreachable: true来忽略网络错误。 - 使用
meta: clear_host_error来清空被标记为unreachable的节点,后续的task才能重新尝试去连接这些主机。 - handler在task失败后就不会被触发,可以在play上指定
force_handlers: True来强制运行handler。 - 使用
failed_when和changed_when来定义task是成功还是失败。 - 使用
any_errors_fatal: true在第一个失败的任务后中断所有任务和play的执行。 max_fail_percentage: 30指定在30%的主机执行任务失败后终止后续任务和play的执行。
如何给受控节点设置环境变量?
可以在play,block,task级别使用environment给受控节点设置环境变量。
1 | - name: Example for environment |
如何使用ansible模块?
Ansible module是最终跑在受控节点上的ansible组件,负责完成任务,维护受控节点状态并最终给控制节点返回结果。
- 可以用
$ ansible-doc -l查看所有的模块。 - 可以在play, block, task level用
module_defaults给ansible模块指定默认参数。1
2
3
4
5
6
7- hosts: local
module_defaults:
ansible.builtin.file:
owner: root
group: root
mode: 0755
... - 可以在
/etc/ansible/plugin_filters.yml文件中禁止ansible加载指定的模块。
什么是Ansible插件?
Ansible 插件(plugin)是对Ansible核心功能的增强,plugin可以分为如下几类:
- Action plugins
- Become plugins
- Cache plugins
- Callback plugins
- Cliconf plugins
- Connection plugins
- Docs fragments
- Filter plugins
- Httpapi plugins
- Inventory plugins
- Lookup plugins
- Modules
- Module utilities
- Netconf plugins
- Shell plugins
- Strategy plugins
- Terminal plugins
- Test plugins
- Vars plugins
可以在这里获得所有插件的说明。
Collection是什么?
Collection是Ansible的分发格式,也就是所谓的包,用户可以把自己的role,playbook,module,plugin以collection的形式放在分发服务器上,供其他用户安装使用。可以在这里找到官方仓库的collection列表。
要使用一个collection,用户需要:
- 使用命令
$ ansible-galaxy collection list查看已经安装的collection。 - 使用命令
$ ansible-galaxy collection install space_name.collection_name安装一个collection。 - 安装完成之后就可以在playbook的task中以
space_name.collection_name.module_name来使用了。
 微信
微信- 支付宝